Print A Worksheet In Excel: A Comprehensive Guide
In the realm of data management, Excel reigns supreme. Its versatility extends beyond mere calculations; it empowers users to present their data in a visually appealing manner through the art of printing. This comprehensive guide will delve into the intricacies of printing a worksheet in Excel, ensuring that your printed documents convey your data with clarity and professionalism.
From understanding the basics to exploring advanced techniques, we will navigate the printing process step by step. Whether you seek to print a single worksheet or multiple, customize headers and footers, or troubleshoot common issues, this guide will serve as your trusted companion.
Understanding the Basics

Printing a worksheet in Excel is essential for sharing and preserving your data in a physical format. Excel offers various printing options, enabling you to customize the appearance and layout of your printed worksheet. Understanding these options and choosing the appropriate settings will help you achieve high-quality printouts.
Different Printing Options
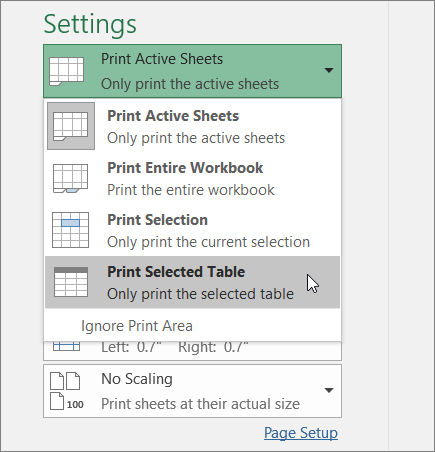
Excel provides a range of printing options, each catering to specific needs. You can choose from printing the entire worksheet, selected portions, or even specific cells. Additionally, you can opt for landscape or portrait orientation, adjust margins, and modify page breaks to optimize the layout.
Choosing the Right Settings
Selecting the right print settings is crucial for obtaining the desired results. Consider the following factors when choosing settings:
– Paper size: Ensure the selected paper size matches the printer’s capabilities and the desired output size.
– Orientation: Choose landscape orientation for wider tables or portrait orientation for taller data.
– Margins: Adjust margins to ensure the printed content fits within the page boundaries and is readable.
– Page breaks: Insert page breaks to control where the worksheet is divided across multiple pages.
– Print quality: Select the appropriate print quality based on the desired level of detail and the printer’s capabilities.
Step-by-Step s
Follow these s to effortlessly print your worksheet:
1. Open the Excel worksheet you want to print.
2. Click the “File” tab in the top left corner of the window.
3. Select “Print” from the menu on the left.
4. In the “Print” dialog box, select the printer you want to use.
5. Choose the number of copies you want to print.
6. Select the page orientation (portrait or landscape).
7. Click the “Print” button to start printing.
Advanced Printing Techniques

Innit, printing in Excel can be a doddle, but when you wanna take your worksheets to the next level, these advanced printing options will sort you out.
Printing Multiple Worksheets
Need to print a bunch of worksheets at once? No stress, mate. Just select the worksheets you want in the “Sheet” tab and hit “Print”. You can also print a range of worksheets by entering the first and last worksheet numbers, separated by a colon (:).
Scaling
Wanna make your worksheet fit perfectly on the page? Use the “Scale” option to shrink or enlarge it. Just enter a percentage (like 75% or 150%) and Excel will do the rest.
Headers/Footers
Headers and footers are like little notes that appear at the top and bottom of your printed worksheet. You can add things like the worksheet name, date, or page number. To create a header or footer, go to the “Page Layout” tab and click on “Header & Footer”.
Troubleshooting Common Issues

Printing in Excel can sometimes throw up unexpected challenges. Here are some of the most common issues and how to fix them:
Print Preview Not Displaying Correctly
If the print preview doesn’t show what you expect, try refreshing it by pressing F9. If that doesn’t work, try changing the printer driver or updating the printer software.
Printer Not Responding
Check that the printer is turned on and connected to your computer. If it’s still not responding, try restarting the printer or unplugging and replugging it.
Error Message: “Printer Not Found”
Make sure that the printer is turned on and connected to your computer. If it’s still not found, try restarting the printer or unplugging and replugging it.
Error Message: “Out of Memory”
Close any unnecessary programs and try printing again. If that doesn’t work, try increasing the virtual memory on your computer.
Error Message: “Invalid Page Range”
Make sure that you have entered a valid page range in the print dialog box.
Error Message: “Margins Too Small”
Increase the margins in the page setup dialog box.
Error Message: “Document Too Large”
Try printing the document in smaller sections.
Creating Custom Printouts

Custom printouts can be created by utilising headers, footers, and page breaks in Excel.
Headers and footers can be used to add additional information to the top and bottom of each printed page, such as the document title, page number, or company logo. Page breaks can be used to control where the next page begins, allowing you to create multi-page printouts.
Using HTML Tables or Tag Blockquotes for Formatting Custom Printouts
HTML tables can be used to create custom printouts with a more structured layout. Tables can be used to align text, images, and other elements in a specific way. Tag blockquotes can be used to create indented text, which can be useful for creating custom headers or footers.
For example, you could use an HTML table to create a custom printout that includes the document title, page number, and company logo in the header, and a table of contents in the footer. You could also use tag blockquotes to create a custom header that includes a quote or other text that you want to highlight.
FAQ
Q: Can I print multiple worksheets simultaneously?
A: Yes, you can print multiple worksheets at once by selecting them in the “Sheet” tab and choosing “Print” from the “File” menu.
Q: How do I adjust the print scale to fit my paper size?
A: In the “Page Setup” dialog box, under the “Scaling” section, you can specify the percentage of the original size at which you want to print the worksheet.
Q: Can I add headers and footers to my printed worksheets?
A: Yes, you can create custom headers and footers by clicking on the “Page Layout” tab and selecting “Header & Footer” from the “Page Setup” group.